
Saturday, June 1, 2013
Thursday, May 30, 2013
.jpg) Efke R 25. I am not sure that this expired film has an equal today? I have heard that Fomapan, or Adox or someone like them have taken up the formulation to make a similar emulsion? R 25 was my favorite film. I still have some rolls in the freezer. I parcel it out as if it were gold. Looking at this image shot in my GS-1, and developed in Caffenol 27g of soda, 9.8g ascorbate, 24.6g Folgers, I am reminded as to why I covet this film so immensely. This was a very flatly lit day, with not much tonal distinction in the sky, yet with minor contrast and brightness tweaks while editing with GIMP drama comes forth! If anyone reads this and has found there to be and equal to Efke R25 Please comment. I will be greatly saddened when my stash runs out. I have so many images that are calling for R25, and I have turned my hearing inward as I am far to greedy to allow myself to shoot un-worthy images. I am sure that I have missed many opportunities due to this greed.
Efke R 25. I am not sure that this expired film has an equal today? I have heard that Fomapan, or Adox or someone like them have taken up the formulation to make a similar emulsion? R 25 was my favorite film. I still have some rolls in the freezer. I parcel it out as if it were gold. Looking at this image shot in my GS-1, and developed in Caffenol 27g of soda, 9.8g ascorbate, 24.6g Folgers, I am reminded as to why I covet this film so immensely. This was a very flatly lit day, with not much tonal distinction in the sky, yet with minor contrast and brightness tweaks while editing with GIMP drama comes forth! If anyone reads this and has found there to be and equal to Efke R25 Please comment. I will be greatly saddened when my stash runs out. I have so many images that are calling for R25, and I have turned my hearing inward as I am far to greedy to allow myself to shoot un-worthy images. I am sure that I have missed many opportunities due to this greed.Thursday, April 25, 2013
 Yesterday I was out and about again in Denver, first sunny day out of several snowy ones. I was carrying the Bronica 6 x 7 loaded wit Expired Adox CHS ART, sadly no longer available in the US. It is really really wonderful film sharp not too contrasty fine grain, and not as big a pain in the ass to work with as CMS 20. These two vastly different looking images are from the same roll. The oddity is that the image below was scanned using color transparency preset on my Epson 4490. Once the image was in GIMP I just inverted the color. This roll was processed in caffenol CM with 25% reduction in soda from my last day of developing. Everything else is the same.
Friday, April 19, 2013

 images are on Fuji Acros 100. Super sharp, super constrasty. I don't like the high level of contrast that much, but I do like the sharpness. I need to learn more about how to control contrast with my wet process, as my current tool set for dry process, GIMP and Aperture are unable to tame it without other consequences arising from the adjustments.
 The tale of the two icicle images. The first image above is what I intended the image at the right to look like as it came out of the camera. I had placed a single strobe under the sandstone overhang to add some highlight to the ice. I could not get the flash into position without the risk of it getting soaked from the dripping snow melt. I didn't have my optical slave with me so I only had a three meter cord which was not long enough to get the light where it was needed. With some effort I was able to simulate my flash intent with OnOne FX.

minutes but right at the time I was going to pour in the developer I noticed that my chemical temperature was 21.3 C so I shortened the time to compensate. I am not very good with floating variables in the process. So I do not know if my compensation was correct. The negatives were extremely dense so I think I am good with that. It has been suggested from Mike(mikeinlagardette at flickr) that I reduce the amount of soda or the under expose during shooting to minimize the contrast of the Acros 100 film. I need to shoot another roll and follow through with this experiment. The negative in the second shot by the way was beautiful. The staining and coloration was completed post production. To illustrate the fine grain and clarity of Acros I did what is close to a 100% crop with this shot and still have very clean and distinct edges, and only slightly more grain.

Saturday, April 6, 2013
Negative Fun
 This is a negative that had problems. It is completely under exposed to the point where I almost didn't scan it. But....the beauty of scanning is instant gratification via twiddling the histogram sliders. I don't leave the sliders in a "Twiddled" state to complete the scan I set them so that the maximum data is acquired for 255 shades of gray. Also aside from the dark image, which I kind of like by the way, are the two racing stripes that are consistant with water residue running down the length of the negative strip as it is hanging to dry. I am not sure why this is happening as I used very clean wash water and wetting agent to help the water sheet off of the negative. My next processing will utilize nylon negative clips of a different design that will not retain a little pocket of water to be released as the remainder of the strip had dried???
Thursday, April 4, 2013
Adox CMS 20 Miraculous Film Developed in Caffenol LC+C
 Yesterday I was shooting in downtown Golden(again) and was standing at the intersection of 10th and Washington. This building has intrigued me. I would like to live there and have a Gallery on the first floor. Why not. It is perfect just look. The image is a 1 min exposure using a variable intensity neutral density filter. It was set at about 8 stops, that's why the 1 minute exposure. This is Adox CMS twenty film and I was shooting at ASA 12, so it doesn't take much to slow things down. Notice the highlight squiggly things infront of the door to the building. Those are left over from cars passing through the camera's field of vision while the shutter was opened. Neutral Density(ND) filters are neat as they allow you to capture images in busy locations without too much worry about cars and gawkers finding their way into your pictures. Unless of course you want gawkers in your pictures. Sometimes thats cool.
Larger versions of these images can be found at Imbricate Silver 1at www.blindcurveimages.com
and Pilates at www.blindcurveimages.com
Wednesday, April 3, 2013
Shooting Ilford Pan F 50 along Clear Creek
A very misty foggy day with low very neutral light, and slow film, add to that a 10 stop Neutral Density filter and I had a pretty interesting day of shooting and processing. The foot bridge image was taken with a Bronica ETRSi with the 40mm lens. I was shooting at F:22 as I wanted everything in the frame to be as well focused as possible. I later found a problem that I don't usually try to account for during processing that I will discuss later. Using a Vivitar Variable Neutral Density Filter (NDX) was an attempt to provide more shadow detail and less contrast as I was shooting up at the sky from a tripod set approximately 1 foot from the ground. There was enough light scatter in the sky to make my incidental meter read EV of 17 - 18. So I used a spot meter to read the undersides of the bridge beams, and placed those between Zone III and IV. at EV 15. My spot reading for shutter speed at F:22 was 1/2 second. I set my shutter to Bulb and kept it open for 1 min. (This was approximately 7 stops?)
 The processing headache encountered later aside from the usual dust was that the lens correction for this image due to the location of the camera and proximity to the bridge was extreme to say the least.
 This image was taken a small distance up stream from the bridge scene. I again utilized the NDX filter at 8 stops this time. The light for this shot had lessoned substantially and I was shooting down into a very dark area of the canyon with a 150mm telephoto lens on the same Bronica camera. I measured the scene via my AE finder set at F:22 the meter returned a 1/2 second exposure duration. I then measured the dark shadows on the near ground rocks with my spot meter and got an EV of 12 this correlated to a speed of 2 seconds at F:22. Adding the NDX at 8 stops and a wishful correction for the 150mm lens I decided to set the shutter at Bulb again and leave it open for 10 minutes! This is the result with only minor exposure correction but a huge amount of dust removal. And after looking at it on my computer for a day I decided to add some contrast back in. I think that Pan F is pretty neutral film for my taste?
I processed this image in Caffenol STD for 7min and 45 seconds. The negatives looked EXTREMELY thin and very pink. When looking at the Zoomed image in Epson Scan however they were quite contrasty. I was very happy with the detail given the film. I do not shoot Ilford films very often so I did not know what to expect.
Saturday, March 23, 2013
Can't Find Reliable Recipe for Caffenol on Foma 200
.jpg) |
| Fomapan 200 @ ISO 100 Nikon N80 Processed R09 9 mins. |
Tuesday, March 12, 2013
Post Script to The Most Recent CMS Twenty Shoot
It is hard for me to go back and look through my volumes of records for past shoots. Why? I think it relates to not being able to read or at least make sense of my field notation scribble. WTF does that mean. I usually take short cuts writing as I am all about making the most of light and time while behind the camera. Time and Light are even more important with film. I only have 12 - 15 exposures for each shoot, and I really don't want to bracket that often as I think what drudgery it is to process 15 exposures of film expecting that only five or six of them to be usable.

That out of the way, I did look up my last CMS shoot at the Coors site, and have discovered that I exposed the CMS 20 at ASA 12. The shoot this week was conducted at between 16 and 20 ASA. (That is the best accuracy I can expect from my Luna Pro Light meter.) Thinking back sunny 16 would have been perfect, as it was very sunny.

That out of the way, I did look up my last CMS shoot at the Coors site, and have discovered that I exposed the CMS 20 at ASA 12. The shoot this week was conducted at between 16 and 20 ASA. (That is the best accuracy I can expect from my Luna Pro Light meter.) Thinking back sunny 16 would have been perfect, as it was very sunny.
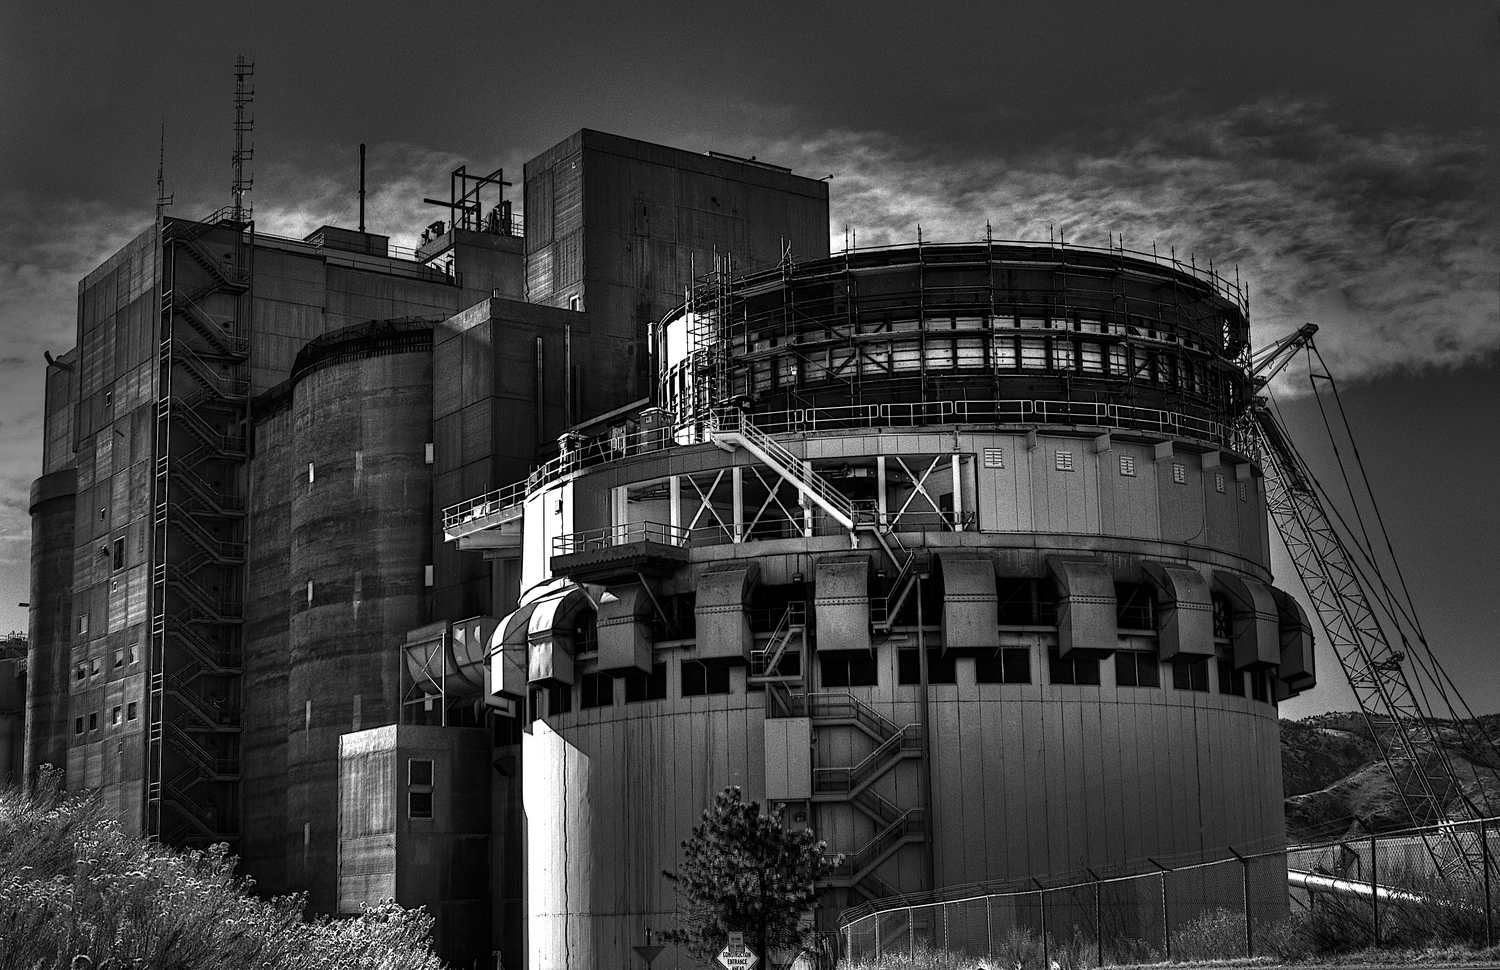
This isn't Film But a Kickass Image No?
Monday, March 11, 2013
Shooting Adox CMS 20 120
Caffenol LC+C
I shot a roll of Adox 20 yesterday. Conditions were perfect, bright sun, some clouds to occupy the sky, and a monstrous piece of architecture with all manner of detail. Weird lines angles circles, ellipse, everything a micro film could want. I have processed the negatives using the LC+C recipe with an addition of Sodium Sulphate. As soon as I scan them today or tonight, I will post some un-edited images here. My first impression is that they look beautiful. There is a medium to heavy coffee stain as one would expect after 18 minutes in the soup.
 Good detail but pretty grainy.

So this is the result of 18 min in Caffenol LC+C. The negatives looked super dense and contrast also looked perfect. However once scanned they seemed to be quite grainy, more so than when developed in Adotech II, and to get to this image I had to do several rounds of up resizing and sharpening. So My next test will be to try to shoot in the same conditions again then develop in Adotech II. I like the look of this image it is just quite noisy in the sky highlight areas.
Better
.jpg)
This is more like it there seems to be less noise and I did not have to work at sharpening excessively. No Polarizer was used on this shot! Hmmmm! I did do some sharpening and the usual dust removal. Oh and by the way I am just doing a straight up scan at 1451% 360dpi.
 I am not so sure. Still required a lot of sharpening via Perfect FX and Aperture. Then as always highlight grain became evermore apparent.
Better Yet?
 I am not so sure. Still required a lot of sharpening via Perfect FX and Aperture. Then as always highlight grain became evermore apparent.
 Adox CMS 20 Processed with Adotech II

This image is knife sharp and is representative of what I would want to achieve from Caffenol of some iteration. Can it be done?
This is a color rendition of what I will be reviewing in Silver via Adox CMS 20
.jpg?format=1500w)
Wednesday, March 6, 2013
Meh!
I ran a roll of Arista 400 Premium through Caffenol STD for nine minutes. I shot this film at box speed(400ASA). The negatives look pretty under developed, thin. I will make an attempt at scanning a couple of the more dense frames later today. Just so everyone understands the Standard recipe that I used is from caffenol.org and is the recommended soup for Tri X, or Delta 400. I should try another roll and see if 12 - 15 minutes brings back some density?
As it turns out my initial assessment was incorrect. The negative density was quite good. The most stunning thing about this experiment was the detail and sharpness of the images post scanning. See below:


As it turns out my initial assessment was incorrect. The negative density was quite good. The most stunning thing about this experiment was the detail and sharpness of the images post scanning. See below:


Not so Meh!
Caffenol LC+C (Metric) and Adox CMS 20
I am working myself up to processing some of my precious CMS 20 in Caffenol. From what research I have been able to do I have found the following starting point. It is this recipe that came from richard314159 at flickr.
Recipe:
In 300ml water at 20 degrees C dissolve
18g washing soda (sodium carbonate decahydate)
0.4g sodium sulphite (optional)
shake and leave to settle. Then dissolve in this
5.5g instant coffee granules
0.4g ascorbic acid powder
My adaptation is to achieve proper solution at 650ml working volume for my Patterson tank and 120 roll film.,this is my table:

Recipe:
In 300ml water at 20 degrees C dissolve
18g washing soda (sodium carbonate decahydate)
0.4g sodium sulphite (optional)
shake and leave to settle. Then dissolve in this
5.5g instant coffee granules
0.4g ascorbic acid powder

richard314159 processed a roll of ATP in the 300ml version of this formula for 20 minutes. Though he did mention that 18 minutes may have been a better time.
I need to look at the records for last roll of CMS that I shot to see what ISO i chose to use. I seem to remember 12, but i will certainly check. I don't want to think about processing time until I have the exposure details worked out.
The issue that I am having about this is I am slightly anxious about blowing a roll of rare film for an experiment. Considering this I am going to be very careful about subject, shot setup, exposure, and processing.
This came from my last shoot with the Bronica and CMS 20:
I will add more later.
Sunday, February 24, 2013
Arista 400 Production Versions
I did a little post prod, with two of the last Arista Images. They are included in this post.
I did not have to do much. The grain to me is acceptable and the sharpness is good for 400 ISO shooting.


I did not have to do much. The grain to me is acceptable and the sharpness is good for 400 ISO shooting.


So we are clear this is the Recipe Caffenol STD. (Via Dirk Essl)

Arista Premium 400 shot ASA 400 Caffenol STD
These actually look nicer that I though they would as I first removed them from the soup.
These were done at nine minutes 20C. Images were shot on N80 using Sunny 16 Rules EV of 15 - 16? I think that the Caffenol managed the grain very well without sacrifice to sharpness.


These were done at nine minutes 20C. Images were shot on N80 using Sunny 16 Rules EV of 15 - 16? I think that the Caffenol managed the grain very well without sacrifice to sharpness.


Thursday, February 21, 2013
More to Come
The idea here is to publish results, from my experimentation with home made film processing systems. I have processed 6 - 7 rolls of film now using variations of Caffenol, I have found the initial formulae in several different locations on the internet i.e. digitaltruth, APUG, and Caffenolblogspot.com. All films except for one looked stunningly beautiful when pulled from the wash. The one odd ball was a roll of HP5 that I tried to stand process in very week solution of CM. I let stand for 45 min, and ended up with a clear strip of 35mm film? I also intentionally under exposed a couple of stops. That was pretty early on in my experiment so I am going to take a do over on that roll.
I have just begun to shoot Foma film and most advice available on popular forums has said to shoot them a 1/2 Box Speed. So that is what I have been doing. I generally look up the film on digitaltruth prior to shooting to see what their opinion is regarding Caffenol processing. The Efke and Adox films that I have processed were all done at box speed.

This is another shot from the Efke R25 Roll that I processed in Caffenol CM. I used a little Tilt Shift Software Post Prod to get the Tiny Town image below.
.jpg?format=1500w)
I have just begun to shoot Foma film and most advice available on popular forums has said to shoot them a 1/2 Box Speed. So that is what I have been doing. I generally look up the film on digitaltruth prior to shooting to see what their opinion is regarding Caffenol processing. The Efke and Adox films that I have processed were all done at box speed.
This image was taken with Bronica ETRsi using a graduated Medium Density Filter. F:22 2 seconds. Yeah Pretty slow for a day light shot!
Subscribe to:
Posts (Atom)